Dial Caliper Simulator
Interactive precision measurement trainer
1 Overview
This dial caliper simulator is a free online tool for practising the one skill a dial caliper actually demands: adding a beam reading to a dial reading without losing a revolution. Three real instruments are built in — 0.001″ (0.100″ per revolution), 0.02 mm (2 mm per revolution) and 0.01 mm (1 mm per revolution) — and all three share one 0–6″ / 0–150 mm body, exactly as a real 505-series caliper does. Four modes — Simulate, Explore, Practice and Quiz — take you from the mechanism to a scored reading test.
No sign-up, no download, no plugin. It runs in the browser on a phone, a tablet or a workshop PC.
2 Controls
- Drag the sliding jaw left or right to set any opening, or use the left/right arrow keys to step one dial division at a time.
- Instrument pills choose the graduation: 0.001″, 0.02 mm or 0.01 mm. This is one choice, not three settings — changing it re-cuts the beam as well, because on a real caliper the beam graduation and the travel per revolution are the same distance.
- Zero Error puts a bezel misalignment into the instrument, in whole dial divisions, up to ±5. Zero the bezel removes it the way you would on the bench.
- Zoom frames the needle tip and the beam index together — never one without the other, because the reading needs both. It follows the needle round the dial, so the tip you are reading is always in view.
- Clamp screw — the slotted screw beside the dial case, or the Lock button on the toolbar. Freezes the reading so it cannot drift while you read or withdraw. See section 2b.
- Fine adjustment thumbwheel — the knurled wheel on the skirt below the beam. Click, hold, drag or scroll it to place the needle a division at a time. See section 2b.
- Dial clamp screw — the small screw at the bottom of the dial case. Slacken it and the bezel itself can be turned to bring the needle to zero, which is the bench way of doing what the Zero the bezel button does in one click. See section 2b.
2b The Clamp Screw, the Thumbwheel and the Bezel
Three parts of this caliper are controls in their own right, worked on the drawing itself rather than from a panel. They are the same three you would reach for on the bench, and each one is drawn where the real instrument carries it.
Clamp screw — freezes the reading
The slotted screw on the slider, tucked against the right-hand side of the dial case. Click it to clamp the jaws, click again to release; the Lock button on the toolbar is the same control with a second handle, and the two always agree.
- Clamped, the screw turns gold and carries a padlock, and it keeps that state even in the magnified view — a caliper you have locked must not look unlocked just because you moved in for a closer look.
- Every blocked attempt says why, on the canvas and to a screen reader. Both routes are refused: dragging the jaws and the ← / → arrow keys.
- It releases itself when the tool drives the jaws for you — the guided reading, the Play sweep, or loading a workpiece.
On the bench: lock, withdraw, then read. On a dial caliper it matters twice over, because dragging a loaded instrument off the work can nudge the rack and take the needle with it.
Fine adjustment thumbwheel — places the last divisions
The knurled wheel on the skirt, below the beam. Dragging the jaw is fast but coarse: one pixel of hand movement is about 0.2 mm, which is ten divisions on the 0.02 mm dial and twenty on the 0.01 mm one. The wheel is how you land on a chosen division.
- Click its left or right half for exactly one dial division. Right opens, left closes; the arrow under your pointer blinks so the direction is visible before you commit.
- Hold it to keep feeding, accelerating as you hold, and it stops by itself at the end of the travel or against a part.
- Drag from it for a fine continuous feed — about three screen pixels per division. A drag begun anywhere else keeps the fast traverse.
- Scroll the wheel anywhere over the caliper for one division a notch.
It is geared to the rack, so it turns whenever the jaws move, not only when you touch it — the same coupling that drives the needle.
Dial clamp screw — sets where zero is
The small screw at the bottom of the dial case. Click it to slacken the bezel; the rim then takes a dashed grip ring and can be dragged round, carrying the dial zero with it. Click again to tighten.
- It is a control only while the instrument actually has a zero error — switch Zero Error On to give it something to correct. With no error the needle is already on zero, so turning the bezel could only move it off, and the screw is left inert rather than offering that.
- Watch the Observed and Corrected figures as you turn: the corrected size never changes, because the part has not changed. Only what the instrument indicates does.
- Turning the bezel back to zero disables the Zero the bezel button, which is the tool telling you there is nothing left to null.
On the bench: wipe the faces, close the jaws gently, slacken the clamp, turn the bezel until the needle sits on zero, re-tighten and check again. Do it only with the jaws fully closed — zeroing on an open caliper bakes that opening into every measurement afterwards, and nothing on the instrument shows it was done.
3 Taking a Reading
In Simulate mode the caliper responds freely. Drag the jaw and watch the needle sweep: every full turn advances the index line by exactly one beam graduation. That relationship is the instrument, and seeing it move is the fastest way to stop dropping revolutions.
The panel underneath breaks the reading into BEAM, DIAL and GRAD, then shows the sum. Read the beam first, then the needle — the panel is deliberately laid out in that order.
3b Measuring a Real Object
The Measure an object button drops a real workpiece into the jaws — bar, cylinder standing or lying, ball bearing, cube, M12 nut, Ø10 drill shank, gauge plate, and a ring measured on the inside jaws.
- Pick a part. It seats against the fixed jaw and the sliding jaw swings open, as a real measurement starts.
- Close the jaws (drag, ←, or Close onto part). They stop dead on the part — they cannot pass through it.
- Read the beam, then the dial.
Orientation matters. The same cylinder appears twice: standing, the jaws close on its diameter; lying down, they span its length. The hex nut is measured across flats, never corners.
Sizes are realistic, not tidy. A 5/8″ ball is 15.88 mm; on a 0.02 mm dial it resolves to 15.88 mm, and on the 0.001″ dial it reads a clean 0.625″. Where the part falls between divisions the object bar says so — that gap is the instrument’s resolution limit, not a mistake.
3c “Show me How?” — Guided Reading
The round play button at the bottom-right of the caliper, beside Measure an object, starts a guided reading of whatever is currently on the instrument. Every arrow, highlight and count is drawn on the beam and the dial face themselves, and every number comes from the same calculation the readout tiles use.
Because a dial caliper reads in two places, the view moves with the steps: in on the beam, up to the dial, then back out for the sum.
- Step 1 — Read the beam. A measuring line grows to the slider index and an arrow marks the last graduation it passed. The caption reminds you that each beam line is one full turn of the needle — 0.100″, 2 mm or 1 mm — and not a tenth of anything else.
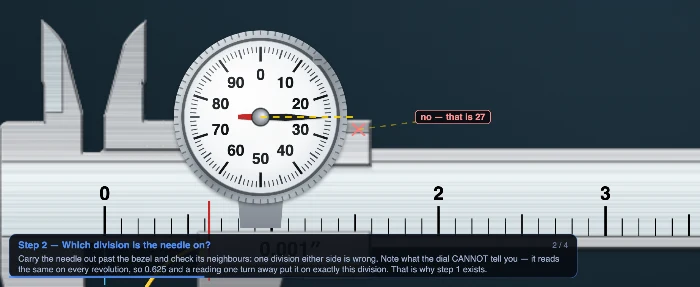
- Step 2 — Which division is the needle on? The needle is carried out past the bezel and its neighbours rejected, and the caption spells out the one-revolution problem: the dial alone cannot say which turn you are in.
- Step 3 — Read the dial. The count starts at the nearest numbered graduation and steps the last few divisions to the needle. On the metric faces those numerals are in millimetres (0.2, 0.4…), on the inch face they are division numbers (10, 20…) — the walkthrough quotes whichever is actually engraved.
- Step 4 — Total Reading, revealed row by row.
- Step 5 — Zero error, shown only when there is one, with a pointer to the bezel clamp you would slacken on the real caliper.
Controls: Space play/pause, →/← next and previous step, Esc to close, or the four buttons on the canvas. Moving the jaws, switching instrument, zeroing the bezel or loading a part ends the walkthrough — the steps were built for the reading that was on the caliper when you started it.
It is hidden in Quiz mode, and in Practice until your answer has been marked.
3d The 3D View
Press 3D in the caliper’s toolbar (on a phone, the 2D | 3D switch sits just above the instrument). It is the same instrument, not a copy: every reading, grade and walkthrough step comes from the same calculation as the flat view, and the choice is remembered on this device. 2D takes you back.
- Moving the jaws: drag the slider, the dial or the jaws for a coarse move; drag the knurled thumb roller under the slider for one division per few pixels, or click it for one division. Over the slider, one mouse-wheel notch is one division. Click the knurled clamp screw on the top rail to lock and release.
- Looking round: drag the background to orbit, right-drag or shift-drag to pan, and pinch (or ctrl + scroll) to zoom — a pinch never moves the jaws.
- Views: 3D opens on the Whole instrument, and so does every new part or question. Reading is square to the index and the dial; Measure shows the jaws on the part, or a bush cut open on the plane of the inside knife edges with the dial head turned to glass; Inside turns the slider and dial case to glass and names the rack, pinion, gear, idler and needle pinion with their tooth counts; Parallax has an eye-angle slider and says how many divisions an eye off square would misread. Labels names the parts; Close-up adds a corner view of the jaws on a loaded part.
- The bezel: with Zero Error on, click the small clamp screw at the bottom-left of the dial case to slacken it, then drag the bezel round — the face turns under the needle, exactly as you zero a real dial caliper.
In Practice and Quiz the 3D view shows no reading, no dimension and no labels until your answer has been marked; the green contact marks still show, because touching the part is not the answer. If your browser cannot run WebGL the 3D button is disabled and the flat view carries on.
4 How the Dial Works
Explore mode is a reference library in five parts:
- Parts & Components: a labelled diagram with twelve callouts — fixed jaw, dial head, outside and inside jaws, beam, metric and inch graduations, dial face, index line, depth rod, thumb roller and locking screw.
- Caliper Types: dial, vernier and digital compared on what actually decides which one you pick up.
- Graduations: the three instruments worked through, plus the one-revolution trap.
- Zero Error: positive, negative, and how zeroing the bezel differs from carrying a correction in your head.
- Reading Method: the three steps and the five errors that actually happen.
5 Practice and Quiz
Practice mode offers two drills. Play / Pause freezes the caliper at a random opening for you to read; Measure an object loads a part you must close onto first — Check stays greyed out until the jaws are genuinely in contact, so you cannot guess past the measuring step.
Quiz mode is a five-question dial caliper reading test, at least two questions of which are real parts rather than preset openings. A results panel scores you with a row-by-row breakdown. Quizzes work on all three instruments, with or without zero error.
Answers are typed as decimals: three places on the inch dial (1.364), two on the metric dials (25.34). Anything within half a division is accepted.
6 Understanding the Reading
A dial caliper reading has three parts:
- BEAM: the last beam graduation the index line has passed. Each one is a whole needle revolution.
- DIAL: the division the needle points to, 0–99.
- GRAD: what one dial division is worth — 0.001″, 0.02 mm or 0.01 mm.
Inch example: BEAM = 1.300″, DIAL = 64, GRAD = 0.001″ → 1.300 + 0.064 = 1.364″.
Metric example: BEAM = 24 mm, DIAL = 67, GRAD = 0.02 mm → 24.00 + 1.34 = 25.34 mm.
Then subtract any zero error. Note the sign convention: a caliper that reads high with the jaws shut has a positive zero error, and you subtract it.
7 Accuracy and Standards
Graduation is not accuracy. A dial caliper graduated in 0.001″ is permitted an error several times that under ISO 13385-1:2019 (on which JIS B 7507:2022 is based):
- Inch: ±0.001″ over 0–4″, ±0.0015″ over 4–8″
- Metric: ±0.03 mm for a 150 mm instrument
Those limits assume a calibrated instrument, zero checked at the time of use, at the 20 °C metrology reference temperature. A caliper warmed in your hand for a minute has already moved.
How to Read a Dial Caliper — Online Practice Simulator
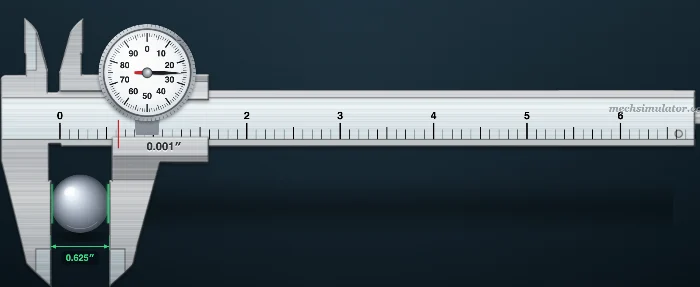
A dial caliper is read by adding two numbers: the beam, which counts whole needle revolutions, and the dial, which gives the fraction of a revolution. Each beam graduation is worth exactly one turn of the needle — 0.100″, 2 mm or 1 mm — so the total is a plain sum with nothing to convert.
This simulator puts three real instruments in front of you and lets you take that reading as many times as it takes. Drag the jaws, close them onto a real part, put a zero error in and correct it, then take a scored dial caliper reading test. It is free, needs no sign-up, and runs in the browser.
Dial Caliper Specifications — the Three Common Instruments
| Instrument | Dial divisions | One division | Per revolution | Beam graduated | Typical range | Accuracy (ISO 13385-1) |
|---|---|---|---|---|---|---|
| Inch (decimal) | 100 | 0.001″ | 0.100″ | every 0.100″ | 0–6″ | ±0.001″ (0–4″) |
| Metric (standard) | 100 | 0.02 mm | 2 mm | every 2 mm | 0–150 mm | ±0.03 mm |
| Metric (fine) | 100 | 0.01 mm | 1 mm | every 1 mm | 0–150 mm | ±0.03 mm |
Notice what the table says twice: the dial always has 100 divisions, and the beam is always graduated at one revolution. Those two facts are why the reading is an addition rather than a calculation.
How to Read a Dial Caliper — Step by Step
- Check zero first. Wipe the faces, close the jaws gently, and confirm the needle sits on 0. If it does not, either zero the bezel or note the error and apply it to every reading.
- Read the beam. Find the index line on the sliding head and read the last graduation it has passed — never the one ahead. Say the number out loud.
- Read the dial. Look straight down at the needle and read its division, 0–99.
- Add them. Total = beam + (divisions × graduation).
- Apply the zero error. Subtract a positive error; add a negative one.
Worked Example — Reading 1.364″ on a 0.001″ Dial Caliper
| Step | What you observe | Value |
|---|---|---|
| 1 | Last beam graduation the index line has passed | BEAM = 1.300″ |
| 2 | Division the needle points to | DIAL = 64 |
| 3 | DIAL × GRADUATION | 64 × 0.001 = 0.064″ |
| 4 | Total | 1.300 + 0.064 = 1.364″ |
Set the instrument pill to 0.001″ and drag the jaw until the readout shows 1.364 to reproduce this exactly. In the workshop this is spoken as “one three six four”, or “one and three sixty-four thou”.
What Is the One-Revolution Error?
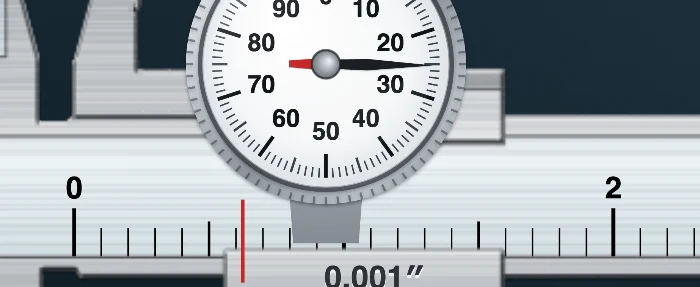
This is the mistake that defines the instrument, and a vernier caliper cannot make it. At 0.140″ and at 0.240″ the dial is identical — the needle sits on 40 in both cases. Only the beam separates them, and getting it wrong costs a full 0.100″ (or 1 mm, or 2 mm).
It is not a fault in the caliper and it is not carelessness with the needle: it is reading the dial first and the beam second. Read the beam first, always. If a measurement is out by exactly one revolution, this is almost certainly why.
“Show me How?” — Watch the Reading Being Taken, Step by Step
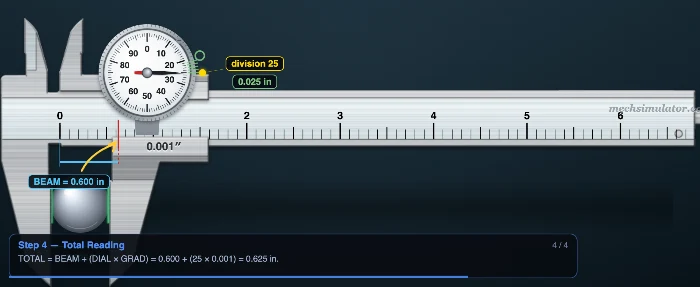
Press Show me How? — the round play button at the bottom-right of the caliper — and the simulator takes the reading currently on the instrument and works through it on the metal itself, one step at a time. Every number it shows comes from the same calculation the readout tiles use, so it cannot tell you something the tool disagrees with.
A dial caliper reads in two places, so the walkthrough looks in two places. The beam and the dial face sit a long way apart, and a single view holding both would barely be a magnification at all. Instead the view moves: it closes in on the beam for step 1, travels up to the dial face for steps 2 and 3, then pulls all the way back out for the arithmetic.
- Read the beam. A measuring line grows along the beam to the slider index and an arrow lands on the last graduation it passed. The caption names the trap for the instrument you have selected — on the 0.02 mm caliper the beam lines are 2 mm apart, and reading them as millimetres halves every measurement you take.
- Which division is the needle on? The needle is carried out past the bezel as a line, and the divisions either side are ruled out. This is also where the walkthrough states the one-revolution problem explicitly: the dial reads the same on every turn, so a reading one revolution away would put the needle on exactly this division. That is what step 1 is for.
- Read the dial. Nobody counts to 64 round a dial face, so the walkthrough does not either: it takes the nearest numbered graduation and steps the last few divisions from it to the needle, showing the running value as it goes.
- Total reading. The TOTAL card's rows are revealed one at a time, in the order you would write them.
- Zero error — shown only when the caliper actually has one, and it points at the bezel clamp, which is how you would null it on the real instrument.
While it runs, the BEAM and DIAL tiles start empty and fill in as the walkthrough derives them, so the finished answer is never sitting on screen while the animation works towards it. Play and pause with Space, step with → and ←, close with Esc, or use the four buttons on the canvas — stepping pauses at the start of each step, which is what you want when talking a class through one. It is hidden in Quiz mode and in Practice until your attempt has been marked.
What Is the Least Count of a Dial Caliper?
The least count is the value of one dial division — 0.001″, 0.02 mm or 0.01 mm depending on the instrument. There is no least-count formula to apply as there is on a vernier, because nothing has to be derived: the number is printed on the dial face.
Least count is not accuracy. A 0.001″ dial caliper is allowed ±0.001″ of error over its first four inches under ISO 13385-1:2019, so the last digit it displays is the same size as the error it is permitted. Treat the third decimal as an indication, not a guarantee, and reach for a micrometer when it has to be right.
Dial Caliper vs Vernier Caliper vs Digital Caliper
| Dial | Vernier | Digital | |
|---|---|---|---|
| How the fraction is read | Needle over 100 divisions | Coincident line | LCD |
| Reading speed | Fast | Slow | Fastest |
| Characteristic error | One revolution out | Wrong coincident line | Flat battery |
| Zero correction | Rotate the bezel | Carry the correction | Zero-set button |
| Survives grit and coolant | Poorly — rack jams | Very well | Poorly |
| Shows movement | Yes — the needle sweeps | No | Poorly — digits flicker |
The needle is the dial caliper’s real advantage, and it is the one most comparisons miss. On comparative work — sorting parts, finding the high spot, checking a batch against a limit — a sweeping needle shows a trend that a flickering digit cannot. That is why dial calipers survive in production inspection long after digital took over the toolbox.
If you are learning the vernier scale instead, the vernier caliper simulator covers 0.02 mm, 0.05 mm, 0.1 mm, 0.001″ and 1/128″ instruments with the coincidence method.
How Do You Zero a Dial Caliper?
- Wipe both measuring faces — a fingerprint is worth several divisions.
- Close the jaws gently, using the thumb roller rather than squeezing the frame.
- Slacken the small bezel clamp screw on the rim.
- Rotate the bezel until the dial zero sits exactly under the needle.
- Re-tighten the clamp and re-check.
Only ever with the jaws closed. Zeroing the bezel on an open caliper bakes that opening in as a permanent error on every measurement afterwards — and unlike a vernier zero error, nothing on the instrument shows that it was done. Turn Zero Error on in the simulator and use Zero the bezel to see the correct sequence.
Can I Watch a Dial Caliper Reading Being Taken?
Yes. Press Show me How? on the caliper and the simulator animates the reading currently on the instrument in five steps — the beam reading, checking which division the needle is on against its neighbours, reading the dial from its nearest numbered graduation, the total, and the zero-error correction. Because a dial caliper reads in two places the view travels with the steps: in on the beam, up to the dial face, then back out for the sum. The BEAM and DIAL tiles start empty and fill in as it derives them, so the answer is not on screen before you have been shown how to reach it. Pause and step it with the space bar and arrow keys. Available in Simulate mode and after a marked Practice attempt.
Is there a 3D dial caliper simulation?
Yes. Press 3D on the caliper's toolbar and the same instrument becomes an operable 3D model: drag the slider to move the jaws, drag the thumb roller for a fine feed, click the clamp screw to lock it, and drag the background to look round it. Its Inside view turns the slider and the dial case to glass so you can watch the rack, the pinion, the gear train and the needle turn together, with the tooth counts that make one needle turn exactly 0.100 in, 2 mm or 1 mm. The Parallax view shows how far the needle reads off when your eye is not square to the dial, a bore is cut open on the plane of the inside knife edges, and with Zero Error on you can slacken the bezel clamp and turn the bezel by hand to null it. Practice, Quiz and Show me How? all run in 3D, free in the browser on a phone, tablet or computer.
Open the 3D dial caliper directly. The vernier caliper has the same 3D view — see the 3D vernier caliper for how its crossed inside jaws measure a bore.
Common Dial Caliper Mistakes
- One revolution out — the signature error. Read the beam first.
- Reading the beam as millimetres on a 2 mm/rev instrument — halves every measurement. Check what one graduation is worth before you add.
- Parallax — viewing the needle from an angle. Look straight down its axis.
- Over-tightening — a caliper is not a clamp. Stop at first contact.
- Rocking the caliper — on an outside diameter keep the smallest reading; in a bore keep the largest. A tilted jaw spans a diagonal and reads large; a chord across a bore is shorter than the diameter.
- Skipping the zero check — a knocked bezel puts the same error into every part in the batch.
Who Uses This Simulator?
Apprentices and machining students meeting a dial caliper before they are trusted with a real one; instructors who need a projectable instrument that cannot be dropped; anyone preparing for a practical measurement assessment where readings are marked to the thousandth. It is also a fair way to settle whether a reading that looks 0.100″ wrong is a bad caliper or a dropped revolution — set the same case up here and see.
Standards and References
- ISO 13385-1:2019 — Geometrical product specifications (GPS): dimensional measuring equipment, Part 1: design and metrological characteristics of callipers.
- JIS B 7507:2022 — Vernier, dial and digital callipers; revised from ISO 13385-1:2019, and the source of the accuracy classes most manufacturers quote.
- DIN 862 — Callipers: measuring uncertainty and permissible errors.
- Instrument geometry follows the Mitutoyo 505 series: 100-division dial, 0.100″ / 2 mm / 1 mm per revolution.
Explore Related Simulators
If this dial caliper simulator was useful, try the Vernier Caliper simulator for the coincidence method, the Micrometer Screw Gauge simulator when 0.001″ is not tight enough, the Dial Gauge (dial indicator) simulator for runout and comparative measurement, and the Steel Ruler simulator for reading a rule in millimetres and sixteenths. The micrometer also runs in 3D: open the Screw Gauge 3D simulation to turn the thimble by hand and cut the sleeve open to see the screw thread that sets its 0.01 mm least count.
Updated